

A Hyper-V lab for your PowerShell sandbox
When learning and playing with new technology like PowerShell, a lab environment is extremely beneficial. Some of the benefits are:
- A lab environment can be torn down and and rebuilt as needed.
- Components can be added to or removed from a lab as needed.
- Actions that are considered risky to perform in a production environment can be performed safely in a contained lab.
Windows 10 Pro, Enterprise, and Education (as well as Windows 8 Pro and Enterprise) come with the same Hyper-V technology that runs in the datacenter, just waiting to be enabled. Here is how to get it installed and configured using PowerShell.
Hyper-V Requirements
To be clear, not ANY Windows 8 or 10 computer can run Hyper-V. There are Windows edition requirements as well as hardware requirements on the system itself.
Windows Edition Requirements
- Windows 10
- Professional
- Enterprise
- Education
- Windows 8
- Professional
- Enterprise
If you have a Home edition of Windows, I would highly recommend an upgrade to Pro. The upgrade price is around $99, which is less than you would pay for VMware Workstation, and with Hyper-V you get the benefits of PowerShell management capabilities.
Hardware Requirements
- Data Execution Prevention
- Second Level Address Translation
- Virtualization Enabled in Firmware
- VM Monitor Mode Extensions
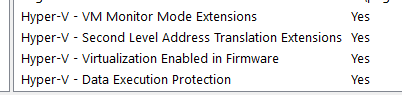
You’re probably wondering how to go about verifying these requirements on your computer? First of all, any modern, reasonably outfitted (Intel or AMD) desktop or laptop is going to meet these requirements, just steer clear of the extreme low-end budget laptops. If you are checking your own computer or can get into a PowerShell prompt on a display model at a store, run the following command. If all of the values are True, then the computer will support Hyper-V.
PS C:\Users\aaron> Get-ComputerInfo -Property HyperVRequirement* | fl


HyperVRequirementDataExecutionPreventionAvailable : True
HyperVRequirementSecondLevelAddressTranslation    : True
HyperVRequirementVirtualizationFirmwareEnabled    : True
HyperVRequirementVMMonitorModeExtensions          : True
Note that Get-ComputerInfo is only in PowerShell 5.1 or newer, so if you are an older version of Windows, you can run msinfo32 and on the Summary page verify the Hyper-V values all say “Yes”.

Adding Hyper-V Windows Features
The Hyper-V components and management tools are already part of the OS, available as optional Windows features. To check the current install status of these features, run the following PowerShell from an elevated prompt. By default, these features will be disabled.
PS C:\WINDOWS\system32> Get-WindowsOptionalFeature -Online -FeatureName *Hyper* | ft FeatureName,State

FeatureName                                State
-----------                                -----
Microsoft-Hyper-V-All                   Disabled
Microsoft-Hyper-V-Tools-All             Disabled
Microsoft-Hyper-V-Management-Clients    Disabled
Microsoft-Hyper-V-Management-PowerShell Disabled
Microsoft-Hyper-V                       Disabled
Microsoft-Hyper-V-Hypervisor            Disabled
Microsoft-Hyper-V-Services              Disabled
To install, run the following PowerShell command from an elevated prompt:
Enable-WindowsOptionalFeature -Online -FeatureName Microsoft-Hyper-V-All
Your system will require a restart after installing.
Restart-Computer
You can confirm the install was successful by re-running the Get-WindowsOptionalFeature cmdlet. You will now see all the Hyper-V related features have been enabled.
PS C:\WINDOWS\system32> Get-WindowsOptionalFeature -Online -FeatureName *Hyper* | ft FeatureName,State

FeatureName                               State
-----------                               -----
Microsoft-Hyper-V-All                   Enabled
Microsoft-Hyper-V-Tools-All             Enabled
Microsoft-Hyper-V-Management-Clients    Enabled
Microsoft-Hyper-V-Management-PowerShell Enabled
Microsoft-Hyper-V                       Enabled
Microsoft-Hyper-V-Hypervisor            Enabled
Microsoft-Hyper-V-Services              Enabled
Create VM network switches
Before we create a VM, we want to create VM network switches to provide networking connectivity. We will create four different switches which are capable of providing different types of network connectivity: External, Internal, Private, and NAT.
External VM switch
Connect your VM to the External VM switch to enable network traffic between:
- VM to VM on the same physical server
- VM to parent system (and visa-versa)
- VM to externally located servers (and visa-versa)
Here is how to create the External VM switch using PowerShell. Note that we get the host adapter name to bind the switch to using the adapter name “Ethernet” as it appears in Network Connections. You may need to change this based on your own configuration.
$NetAdapter = Get-NetAdapter -Name "Ethernet"
New-VMSwitch -Name "External" -AllowManagementOS $True -NetAdapterName $NetAdapter.Name
Internal VM switch
Connect your VM to the Internal VM switch to enable network traffic between:
- VM to VM on the same physical server
- VM to parent system (and visa-versa)
New-VMSwitch -Name "Internal" -SwitchType Internal
Private VM switch
Connect your VM to the Private VM switch to enable network traffic between:
- VM to VM on the same physical server
New-VMSwitch -Name "Private" -SwitchType Private
NAT VM switch
Connect your VM to the NAT VM switch to enable network traffic between:
- VM to VM on the same physical server
- VM to parent and external servers via built-in NAT
The NAT switch is technically the same as an Internal switch, albeit with some additional configuration, currently only accessible via PowerShell!
$SwitchName = "NAT"

# Create the Internal switch to use for NAT
New-VMSwitch -Name $SwitchName -SwitchType Internal

# Create the host interface for the Internal switch. This will be the default gateway used by your NAT'd VMs.
New-NetIPAddress –IPAddress 192.168.1.1 -PrefixLength 24 -InterfaceAlias "vEthernet ($SwitchName)"

# Create NAT object
New-NetNat -Name $SwitchName -InternalIPInterfaceAddressPrefix 192.168.1.0/24
Create your first VM
With networking switches provisioned, we can proceed with creating our first VM. We will create the VM, add a DVD drive to the VM, and mount our Install Media as an ISO.
Create the VM files and virtual disk
The entire block of commands is broken up here, but note that the variables we set at the beginning are used throughout. The install media we are going to use is the Windows Server 2016 Evaluation, which can be downloaded at the Microsoft Technet Evaluation Center.
# Set VM Name, Switch Name, and ISO Path.
$VMName = 'DemoVM'
$Switch = 'External'
$ISO = 'E:\ISOs\WindowsServer2016Eval-14393.0.160715-1616.RS1_RELEASE_SERVER_EVAL_X64FRE_EN-US.iso'

# Create New VM
New-VM -Name $VMName -MemoryStartupBytes 2GB -Generation 2 -NewVHDPath "E:\VMs\$VMName\$VMName.vhdx" -NewVHDSizeBytes 40GB -Path "E:\VMs\$VMName" -SwitchName $Switch
Add a DVD drive to the VM, mount the ISO, and set VM to boot to DVD
# Add DVD Drive to VM
Add-VMScsiController -VMName $VMName
Add-VMDvdDrive -VMName $VMName -ControllerNumber 1 -ControllerLocation 0 -Path $ISO

# Mount ISO
$DvdDrive = Get-VMDvdDrive -VMName $VMName

# Configure Virtual Machine to Boot from DVD
Set-VMFirmware -VMName $VMName -FirstBootDevice $DvdDrive
Back to the GUI – Installing Windows
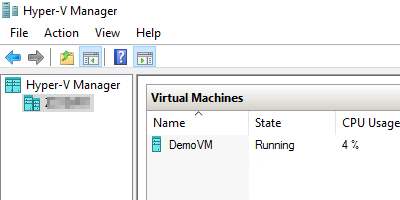
To continue with our lab setup, we need to return to the GUI. In your start menu, find the desktop app Hyper-V Manager and open it. This is an mmc snap-in, so you can also run mmc and add the snap-in.

You will see a your new VM. To open up the KVM console to the VM, right-click the VM name and select Connect… Power it on, and install Windows like you normally would.
Create a snapshot to save the VM state
So you’ve installed Windows, activated your license, set your Administrator password, installed all available updates, and made any other customization you typically make. In order to preserve this pristine state of the VM, we create a Checkpoint (aka a Snapshot). A checkpoint is a point-in-time recovery point. Once you create a checkpoint, any new or overwrite changes to the virtual hard disk are saved to a delta file. If you Apply the checkpoint, it will merge the delta changes with the original virtual hard disk. If you Revert to the checkpoint, everything in the delta file is in essence deleted and you are returned to the original virtual hard disk and the time the checkpoint was taken.
Create a VM checkpoint
Checkpoint-VM -Name "DemoVM" -SnapshotName "Pristine State"
See existing checkpoints for a VM
PS C:\WINDOWS\system32> Get-VMCheckpoint -VMName "DemoVM"

VMName Name           SnapshotType CreationTime          ParentSnapshotName
------ ----           ------------ ------------          ------------------
DemoVM Pristine State Standard     10/10/2016 9:49:30 PM
Revert to a VM checkpoint
When you are done with a sandbox session, you want to revert back to the pristine state so something you did during this session doesn’t conflict with a future session (and you don’t remember what you had previously done). Be aware that this will power off your VM during the process.
Restore-VMCheckpoint -Name "Pristine State" -VMName "DemoVM" -Confirm:$false
Next Steps
Now that you know how to get the foundation configured for a Hyper-V lab:
- Install and configure one on your own workstation! If you don’t have enough storage, consider using a USB hard drive for housing your ISOs and VHDs. If your computer is lacking on the CPU and Memory side, consider getting a desktop to use as a lab system and Remote Desktop to it.
- Explore all of the cmdlets that are part of the Hyper-V module. Start by running Get-Command -Module Hyper-V | Out-GridView for a filterable list of all available cmdlets. Then run Get-Help <cmdlet name> to find out more about what it does.